Thanks for visiting!


Welcome! This is the place where I share my artsy and crafty projects. I am an evolving artist these days ... finding myself enjoying less of the cards and mini albums that I have made for years, and turning to art journaling and more artistic endeavors. I have always enjoyed some craft or other, and some of my earliest memories of my mother helping me make paper dolls and other crafts. I am now in my 60's and finding myself more passionately enjoying creating beautiful things and learning new skills and techniques and products.

While you are here I hope you will find inspiration and ideas for making your own projects, however any images or projects you find here are my personal property and should not be used for your own monetary gain, or for contests or challenges. Thank You!

10/30/2010

Unscripted Sketches Challenge # 79

~

Hi Folks!  Thanks so much for stopping by today!  This week's sketch for 'Sketch It Saturday' at Unscripted Sketches was a breeze, so I decided to try something a little different from my end and use digital images for both the image AND the patterned paper.  Here is this week's sketch . . .


And here is my card based on the sketch . . .


Product Info:
  • Base card stock is Bazzill
  • Patterned paper and Santa image are from PC Crafters 'A Christmas Sampler 3'
  • Poinsettia is from Memory Makers "BlossomSets Poinsettia Cranberry"
  • Gem is from Prima e. Line
  • Stickles 'Golden Rod' and 'Frosted Lace'
  • Tattered Angels Glimmer Mist 'Iridescent Gold'
  • Ribbon and lace from my stash


Tips, Tools and Techniques:
  • Card base cut using Cricut Expression, Walk In My Garden cartridge, card2 set at 5"
  • Patterned paper was printed on inkjet printer, sprayed with glimmer mist, allowed to dry.
  • Then for the base, cut on Cricut Expression, Walk In My Garden cartridge, card1 set at 5"
  • For letters, also cut on Cricut Expression, Songbird cartridge, JOY caps set at 1 1/2".   Blue paper was cut using same except using shadow feature.
  • Image was printed on ink jet printer, cut and mounted on red cardstock and lifted off the card on foam squares.
  • The ribbon on the tree was decorated with Stickles 'Golden Rod' and the fur trim on Santa's suit was decorated with Stickles 'Frosted Lace'.  It took several coats to get the thickness I wanted on the fur on Santa's suit.


I love this image, and all the images from this set.  PC Crafter's images are super easy to use, too, as you simply drag and drop the image you want to use to a Word doc and re-size it to the size you want.  I hope you have enjoyed your visit today!  Please come back soon to see what is up at Camellia Cottage!  Blessings, Becky


~

10/26/2010

Sparkle & Grunge . . .

.

So, my friend Phyllis has created a monster!  At the Country Living Fair that we attended together on Saturday she pointed out some grungy, aged looking tags; some were plain, others decorated with vintage papers, buttons, ribbons, etc.  On Sunday I played around a bit (see post here), but then yesterday (Monday) I really got crazy with the new 'sparkly grunge' idea, and made these lovelies . . .


Three of the prettiest tags I've EVER seen!  My faves are the two most elaborate ones (of course) but think all three are so pretty!  All of the paper products are the same; manilla tags purchased from an office supply store, paper flowers made from the blank pages of a very old journal and an even older 'History of Georgia' school book that is disintegrating as we speak.  The pages are very delicate!  Beyond the paper, let's take a look at them individually:

'merci' . . .


Lots of brown ink, lots of Stickles 'platinum' (my go-to Stickles), 'Iris' seed beads, one tiny lampwork bead, a stick pin made of a quilters pin, more iris beads, and stickles, plain and crinkled seam binding, purple satin ribbon, cut into strips (didn't want to go too crazy with the purple), cotton twine, and a piece of older (not too old) lace.  I grunged the lace and seam binding with a bit of brown ink and even more stickles.


'hello' . . .


As in the others, lots of brown ink and Stickles 'platinum', plus seed beads, other miscellaneous beads, crinkled seam binding, cotton twine, and 'aged' cotton muslin.  The stick pin on this one is from Jenni Bowlin.


'thinking of you' . . .


Once again, lots of brown ink and Stickles 'platinum', plus assorted seed beads, a larger Iris bead, and a larger gold bead, a sparkly bird, a couple of very old buttons in iris-y shades, ivory lace, blue crinkled seam binding, ivory wired organza ribbon, and red twine from a large bag of dog food (and yes, I am a craft supply packrat, thank you very much!). 


I am in love with these tags, and the idea of sending something this pretty instead of a greeting card.  I also look forward to making many more, but it will probably be Saturday at the earliest, but probably next week, because hubby has decided to take off two days in the middle of the week, plus I have a 2 week follow-up appointment with my mom's Opthalmologist to see how her eyes are doing after her cataract surgery tomorrow. I may get to do some playing on Saturday, but who knows!

These tags, along with their white envelopes for mailing, are now up for sale in my Etsy shop, so if you are interested, go check them out!   Thanks for visiting, and blessings friends!!!  Becky


.

10/24/2010

A Couple of Small Projects . . . and a Winner!

~

Hi Folks!  I sure hope you have had a nice weekend!  The weather here in GA has been remarkable, but rain is supposed to be coming in overnight, and I am glad - we need the rain badly!  Yesterday my friend Phyllis and I went to Stone Mountain, GA for the Country Living Fair - put on by Country Living Magazine.  It was INCREDIBLE!!!  Tons of vendors and all kinds of demonstrations - it was such a great day!

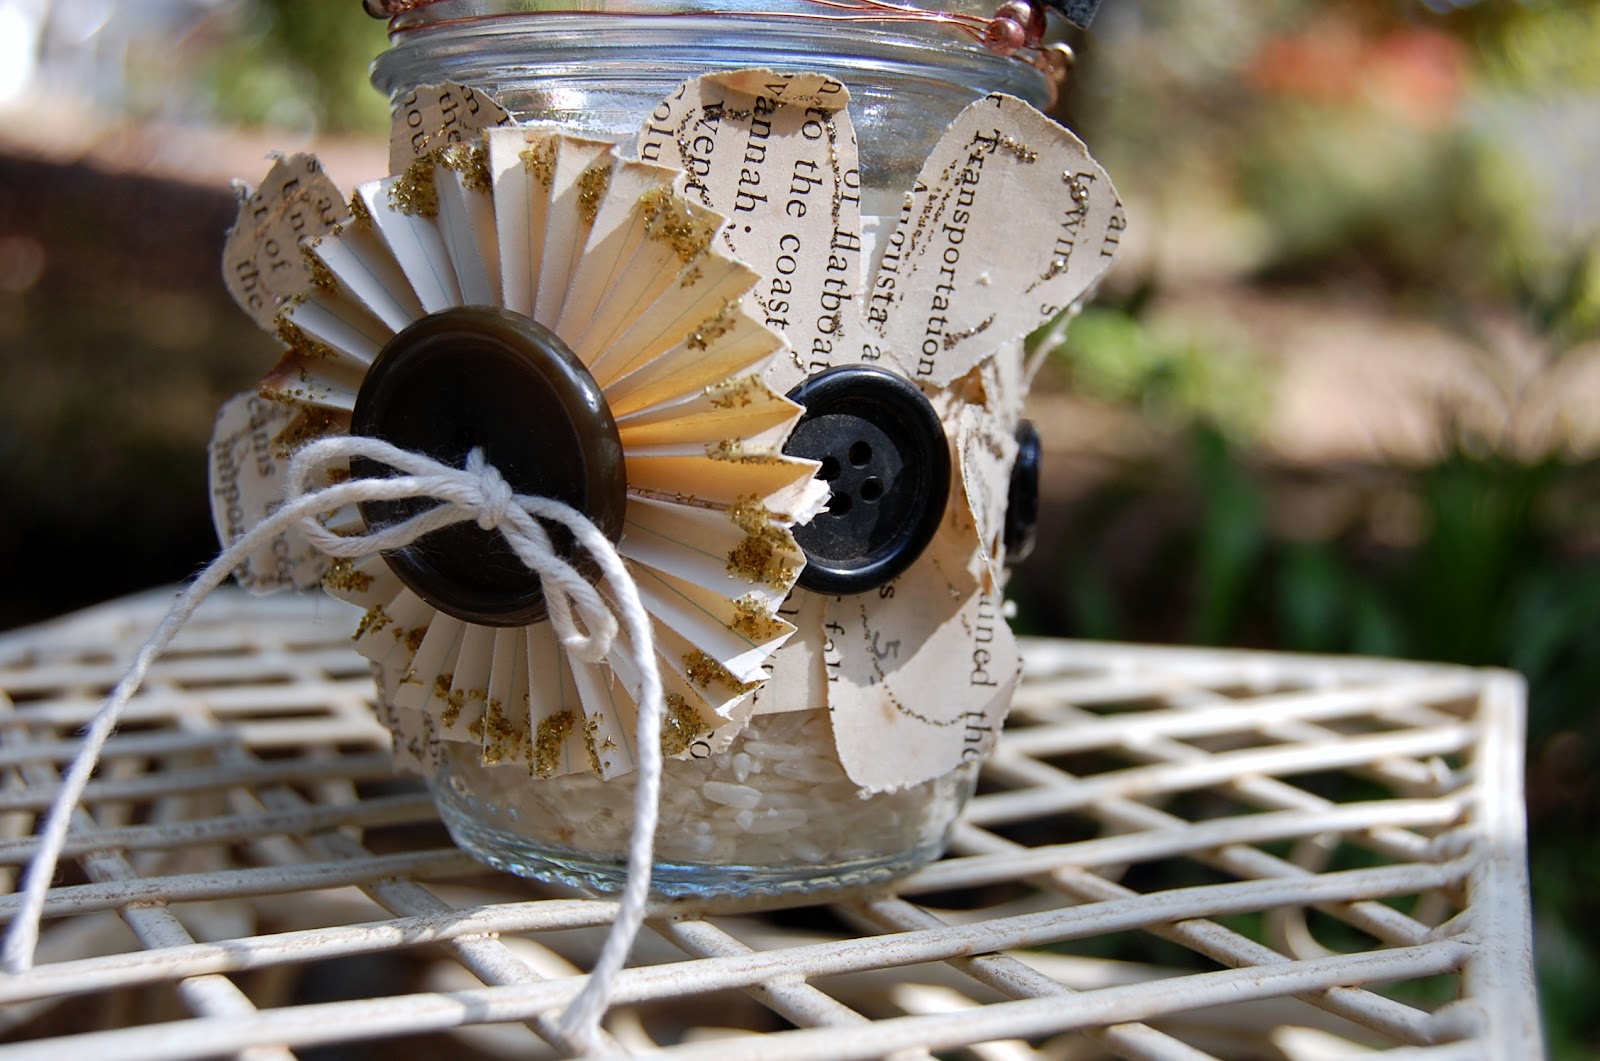
And while we were at the CL Fair, Phyllis kept seeing things she liked and saying "Do you know how to make this?  We could make this!"  So this morning I spent some time trying to make a few of the things we really liked.  First up is a candle jar, just an old jelly jar, decorated with vintage journal pages and pages from an old "History of Georgia" book that was my grandmother's.


I also used vintage buttons, copper wire (need a larger gauge wire) and beads.  There is rice in the bottom of the jar (about 2 inches) and you put a tea light in there and light it - it is very pretty in a darkened room, or hanging over your outside table.

And here is a tag that I distressed and made the flower and leaves from the same History of Georgia book. 


Wouldn't these be gorgeous as the gift tag on a Christmas gift wrapped in kraft paper?  Lovely!!!!  The ribbon is actually tea stained muslin (purchased that way), inked up with some brown ink - they are very easy to make!

And, I know I promised you a winner of my blog candy from the Unscripted Sketches Breast Cancer Awareness Blog Hop, and the winner is . . .


Leila Pierce!!!  Leila is one of the design team members over at Unscripted Sketches, and I will be getting this . . .


. . .  out to her in the next couple of days!  Congratulations, Leila!!!

And thank YOU, friends, for visiting me once again!  Blessings, Becky


~

10/23/2010

Unscripted Sketches Challenge # 78 - Snow Lady

Hello everyone!  Once again it is time for "Sketch It Saturday" over at the Unscripted Sketches challenge blog.  This week's sketch was a bit challenging for me, but I love the card I came up with based on the sketch.  Here is sketch number 78 . . .


And here is my card based on the sketch . . .


Product Info:
  • Base card stock is Die Cuts With a View
  • Patterned paper is Cosmo Cricket, Mitten Weather, 'Deck the Hollies' and 'Woolens'
  • Ribbon from stash
  • Stickles 'Green' and 'Xmas Red'
  • Image from MagisPlace digital images shop on Etsy


Tips, Tools and Techniques:
  • Base card cut using Cricut Expression, Walk In My Garden cartridge, card2 set at 5"
  • Polka dotted paper cut using Cricut Expression, Walk In My Garden cartridge, card1 set at 5"
  • Holly and poinsettia paper was cut using Cricut Expression, Songbird cartridge, frame2 set at 4"
  • Sentiment printed on home printer, backed with scrap of red card stock and popped off the page with foam squares
  • Stickles used on the snow lady's hat, gloves and umbrella


I'm beginning to enjoy making some Christmas cards, and I'm really enjoying using the images I got from Magi at Magis Place on Etsy.  Please go check out her shop!

And don't forget my giveaway from last week's Breast Cancer Awareness Blog Hop!  I will draw a name some time this weekend and post it as soon as I have a chance!  Have a great weekend!  Becky


~

10/19/2010

A Couple of Cards . . . and Some Goodies!

So sorry my posts have been few and far between, but Mama had her 2nd cataract surgery yesterday, and is doing very well, so I took her home - to her home - today, and hopefully things will get back to normal soon..

A little news, which I am so very excited about, is that on Saturday I had a booth at a shop a few miles from here (outside in the sunshine!) and didn't sell a thing, but before I left, I got a part time job working at the shop!  It will only be one day or so per week, and it's not much money, but I'm really looking forward to working with my new boss, Tina!  The shop is called Georgia Mountain Candle Company, and she sells some of the most wonderful candles, as well as accessories like purses, hair bows, etc., AND takes home decor and furniture items on consignment.  Ms. Tina is one busy lady!  If you want to learn more about her candles, and maybe even try one out, you can check out her website by clicking on the picture in my left hand column.

Another cool bit of news is that "I WON!"  A couple of weeks ago I was checking out my news on Facebook, (and no, I'm not sharing my personal facebook ID!) and saw a post from Little Yellow Bicycle about some winners.  Well, I hadn't signed up for any giveaways on there, but decided to see if there were any familiar names on the list of winners.  And yep, sure enough, there was my name!  It was a giveaway for their fans on FB, and they had drawn 10 random names from their fans, and I was one of the ten - and I didn't have to leave a comment or anything!  Isn't that cool!


The prize is a Christmas Card Making Kit with all the stuff to make 8 cards, including the cards, envelopes, borders, glitter stickers, self adhesive glitter chipboard, etc.  I love the designs - they are very cute!


I have made one card from the kit, but just haven't had time to make more than that this week.  Those Little Yellow Bicycle products are really great!

So, enough with the news, let me show you a couple of cards!  First is a Christmas card . . .


Products Used:
  • Card stock is Die Cuts With a View
  • Patterned Paper - Cosmo Cricket Mitten Weather "Deck the Hollies" and "Woolens"
  • Stickles Platinum
  • Ribbon from $1 bin at Michaels - bought ages ago
  • Brown ink is Stampabilities
Tips, Tools and Techniques:
  • Card base cut on Cricut Expression using Walk In My Garden cartridge, Card 2 set at 5"
  • Two labels (patterned paper) cut on Cricut Expression using Songbird cartridge, frame2-s, set at 3 1/4"
And the next card - Thanks . . .


Products Used:
  • Base cardstock is Die Cuts With a View
  • Patterned papers are Cosmo Cricket Togetherness "All A Flutter" and "Making Plans", reverse sides of both!
  • Brown Ink is Stampabilities
  • Lace, button, twine and ric-rack from my stash
  • 'Thanks" rub-on is from KaiserCraft 'Occasions'

Tips, Tools and Techniques:
  • Base of card was cut on Cricut Expression using Walk In My Garden, Card2 set at 5"
  • Green checked paper was cut on Cricut Expression using Walk in My Garden, Card1 set at 4 3/4"
  • Circles for flower (see further instructions below) cut on Cricut Expression using Plantin Schoolbook cartridge, circle, set at 1 3/4", 2", 2 1/4", 2 1/2", 2 3/4" and 3".
  • Stitching was done on my sewing machine
  • Flower instructins:  Take a bowl of warm water and dip the circles in the warm water just for a few seconds, then squeeze them tightly to get out as much water as possible and encourage 'wrinkles'.  Open up the circles and place them on a paper towel in the microwave and heat them at about 20 seconds.  The smaller ones will be dry, but larger ones may still be damp in the center.   Remove the dry ones and ontinue heating remainder in 10 - 15 second increments until they are all dry.  Ink the edges of each circle.  Using a craft knife or hole punch, make hole in the center of each circle and then put a brad through the holes to hold the bloom together.  I glued the button onto the brad.
The flower was a very easy project, and didn't take very long to make, but it makes a big impact on the card.

I hope you enjoyed these cards!  If you haven't already, please visit my previous post and leave a comment for my BCAM blog candy, as part of the Unscripted Sketches Breast Cancer Awareness Month (BCAM) Blog Hop.  I will choose a winner some time this weekend.

Have a great rest of the week!  Becky