Thanks for visiting!


Welcome! This is the place where I share my artsy and crafty projects. I am an evolving artist these days ... finding myself enjoying less of the cards and mini albums that I have made for years, and turning to art journaling and more artistic endeavors. I have always enjoyed some craft or other, and some of my earliest memories of my mother helping me make paper dolls and other crafts. I am now in my 60's and finding myself more passionately enjoying creating beautiful things and learning new skills and techniques and products.

While you are here I hope you will find inspiration and ideas for making your own projects, however any images or projects you find here are my personal property and should not be used for your own monetary gain, or for contests or challenges. Thank You!

9/30/2011

Alphabet Challenge Blog - R is for Recipe

Hello!  This week's challenge over at Alphabet Challenge Blog is to make a project using the following recipe:


  1. One Image
  2. Two backing (or patterned) papers
  3. Three Flowers
And here is my card for this challenge . . .


And  I made this card several weeks ago, and only realized this morning that I didn't follow the recipe!  Why didn't someone tell me!!!

Here are the supplies:

  • Base card stock - The Paper Studio
  • Patterned papers - Doodlebug Designs
  • Flowers and gems - Prima
  • Ribbon - yard sale find
  • Sentiment - SRM Press

Please take time to go visit Alphabet Challenge blog and all the Design Team's blogs to find some beautiful cards and amazing inspiration!  Blessings, Becky!

9/25/2011

Tag Tuesday - Recycle The Trash

Woohoo!  We are back from vacation, and I'm ready to get to crafting again!  We had a great week at a Florida state park near Pensacola, and didn't want to come home.  I guess that's a sign of a great vacation, right?

Rebecca over at the new Tag Tuesday challenge really got creative this week!  Her challenge is to recycle the trash!  Yep, use things out of the garbage to make your tag this week.  Here is my tag ...


I actually took the tag out of the trash because I'd started something and didn't like it, and it was inked black on the edges and kind of crinkled up.  I finished inking the whole front, then added a layer of white tacky glue.  Then I added an old, used, washed, then dried again fabric softener sheet, and tore it into pieces.  It had spider web looking bits, so I knew - okay, spider's web, and kept tearing and layering bits and pieces as long as the glue would allow.

While the glue was wet I sprinkled on some silver German glass glitter, and it gives a really neat effect.  Next I stuck on two SRM Stickers - one says 'creepy' and the other is a spider.  I still wanted something kind of creepy, so I mixed red, yellow, blue and green food coloring with rubbing alcohol, put it into a small spray bottle and sprayed it onto the whole thing., and then dried it with a heat embossing gun.  The labels curled up (which is what I wanted), and the white shows from under the stickers.  It's so not me, but I really love how it turned out!


 It felt good to be creating again! 

The next few weeks are going to be really crazy, because the next 2 weekends I have craft shows, and I'm totally not ready, but I'll get done what I can, and the rest will just have to not get done!  I hope to be back soon with another project!  Blessings, Becky

9/16/2011

Alphabet Challenge Blog - Q is for Quick and Simple

This week's challenge at Alphabet Challenge Blog was fun, but so not me!  The theme this week is 'Q is for Quick and Simple', and although I normally tend to keep piling on stuff and obsessing over getting a project 'just right', this time my card came together in no time!  I used the amazing new papers by Authentique, and they truly are wonderful!  Thick, heavyweight papers, beautiful colors, and a large line of coordinating colors and patterns, are only some of the features of this wonderful new line.

Here is my project based on the challenge . . .


Here are the details . . .

Supplies:
  • Base card stock - The Paper Studio
  • Patterned paper - Authentique
  • Sentiment - SRM Stickers
  • Ribbon - yard sale find!

Tools:
  • Cricut Expression and Walk In My Garden cartridge
  • Scissors, craft knife, ruler, rotary cutter

Cricut Cuts:
  • Card base - Walk In My Garden cartridge, card2 set at 5"
  • Patterned paper - WIMG cartridge, card1 set at 5"

I really love the beautiful roses on this paper, and the big black bow really adds a beautiful accnt.  Thanks so much for joining me today!  Don't forget to go by the Alphabet Challenge Blog (link above) and check out this week's challenge, and all the other DT member's projects!

Blessings, Becky


9/15/2011

Psssstttt! It's official!!!

Announcing . . .

The Friendship's Garden Design Team  'Garden Girls'

Erin Bullock - Ohio, USA
Dena Jones - Hawaii, USA
Carolyn LaBille - Illinois, USA
Ciska Reilly - The Netherlands
CherylAnn Robinson - Canada
Becky Garrison 'Lead Garden Girl' - Georgia, USA

First challenge happens on October 5th - you better be there!!!


9/14/2011

Guest Designer - Papercraft Star Challenge 62 - Anything Goes

I am so very excited to share with you that I am being featured as Guest Designer over at Papercraft Star today!  The challenge for today is 'Anything Goes', and I chose to make a mini-album, or journal, using items from The House Across The Bay (THATB), a wonderful Etsy shop that sponsors Papercraft Star's challenges!  THATB has a large line of digital papers, images and ephemera that is both beautiful and so easy to use!

Here is my project . . .


Supplies:
  • Base chipboard - pieces of 12 x 12 chipboard that come with patterned paper I buy at my LSS
  • Patterned (Ledger) paper - The House Across The Bay (link takes you directly to this item!)
  • Image - The House Across The Bay FREEBIE from Papercraft Star (August 22 post)
  • Sentiment - SRM Stickers
  • Ink - Stampabilities
  • Bits and pieces of ribbons - my stash
  • Jump rings (to hold together) - Hobby Lobby
  • Graph paper for inside pages - WalMart

Tools:
  • Cricut Expression and Elegant Edges (EE) cartridge
  • Computer and ink jet printer
  • Scissors, ruler, craft knife and rotary cutter

Cricut Cuts:
  • Covers and inside pages of journal were cut using the Elegant Edges cartridge - <Swirl1-s> using 'Book' feature.  The chipboard and patterned paper covers were cut at 5" and the graph papers for inside the journal were cut at 4 3/4".

I had lots of fun making this journal, and I want to send a huge THANK YOU!!! to the folks at Papercraft Star for allowing me to be their guest designer today!  Please check out Papercraft Star and The House Across The Bay and see all the DT members projects for today, too!

Blessings, Becky


9/13/2011

Tag Tuesday - Flowerpot

I loved the challenge over at Tag Tuesday this week, because I immediately knew what I wanted to do!  The challenge is to feature a flower pot on your tag, and here is mine . . .


I cut the flowerpot using my Cricut and Walk In My Garden cartridge, but all the leaves and petals are hand cut.  Here are the supplies:

  • Base tag - #5 manila - WalMart (online)
  • Flower pot base - Bazzill 
  • Brown cardstock - The Paper Studio
  • Cream cardstock - yard sale find
  • Brown flower - Prima
  • White flower -stash
  • Inks - Stampabilities and Anna Griffin
  • Embossing Powder - Ranger
  • Ribbon - Hobby Lobby


I loved doing all the cutting, scoring and folding and inking!  And I think it's a really pretty tag.   Thanks for visiting!  Blessings, Becky


9/07/2011

I'm Here!

Hi there!  Just a quick note to let you know I'm here!  I've just been busy with stuff around the house, working on the new Friendship's Garden Challenge Blog admin stuff, and getting ready for some craft shows I'm doing this fall.  Thus no time for challenges!  Oh, and vacation is coming up in a few weeks and I'm trying to get things ready for that, too!  So, I wanted to share a pic I took of some of the crafty things I'm working on . . .


These are just 'parts' that will be used to make larger crafty goodness, but they really make me happy! 

So, although I'm not around so much right now, things will pick up soon!  Talk to you later, Becky

9/02/2011

P is for Pretty Pastels - Alphabe Challenge Blog

Good Morning!  I am sitting in the McDonalds nearest me (8-10 miles) using their wifi because I woke up this morning to no phone and no internet!  So, a quick post!

This week's challenge at Alphabet Challenge Blog is 'P is for Pretty Pastels', and here is my card . . .


All pattterned papers are from K&Co. 'cut-n-paste' stack.  Cardstock is The Paper Studio, Gems from Prima, seam binding and vintage button from my stash.  Inks - Anna Griffin, sentiment is SRM Stickers.

Thanks so much for visiting!  Blessings, Becky


9/01/2011

New Tag Tuesday - Have A Heart

The theme for this week's challenge over at the new Tag Tuesday  is 'Have A Heart', meaning a heart needs to be the focal point of your project.  Here is my tag ...


A few nights ago I didn't sleep well, and the next day I was groggy and pretty much out of it from lack of sleep.  I wanted to do something crafty, but didn't have a plan, so I took a tag and just started playing with inks and embossing powders and even a sheet of silver leaf I found in my stash.  I just played with it and messed around, and here is what I came up with.  As for products, I know I used a Melissa Frances rub-on for the wings, and several Anna Griffin and Stampabilities inks, and I don't remember where the chipboard heart came from.  But I think it's pretty cool!

Thanks for visiting, Blessings!  Becky


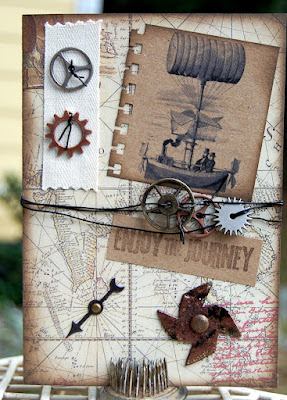
Papercraft Star #60 - Steampunk

It's odd that sometimes what we think is our style and what we think is totally NOT our style, can sometimes merge into a fun combination!  I am finding this is the case with the steampunk trend that is so popular these days.  I would never have thought that I would like making steampunk projects, but instead, I am really loving it! 

This week's challenge at Papercraft Star is to make a steampunk themed project.  Now, I made this project as a part of my application for the Papercraft Star design team, and although I didn't make the team, I still wanted to share this card, because I think it's pretty cool!


Supplies:
  • Base (kraft) cardstock - The Paper Studio
  • Patterned paper - Gartner Studios - Bon Voyage - Map (found at Michaels)
  • Chipboard pinwheel - Bo Bunny
  • Enjoy The Journey Stamp - Tim Holtz
  • Brads, game spinner and sprockets - Tim Holtz Idea-ology
  • Black wire - WalMart hardware department (it's a very soft plastic coated wire)
  • Steampunk image - The Graphics Fairy
  • Inks - Stampabilities and Anna Griffin
  • Embossing Powders - Ranger

Tools:
  • Computer and ink jet printer
  • EK Success border punch
  • Scissors, craft knife, ruler, rotary cutter
  • Heat embossing tool

Tips:
  • I cut the paper so that the lines on the map were so I could put the game spinner in the center
  • The chip board was 'blackboard' chip board, so I inked it and added several colors of embossing powders, heating in between each, to get the grungy look you see
  • For the wired sprockets, I attached the end of the wire to one of the sprockets, then wrapped the wire around once, attached another sprocket, wrapped it once again, attached the last sprocket, and then twisted the wire together to hold it all together.  I really love that look!

And yes, I love this card!  It is perfect for a young man going to college, or an older man retiring and starting a new journey in his life.  Or any other occasion you can imagine!   Thanks so much for visiting me today!  Come back soon and see what I've been up to here at Camellia Cottage.  Blessings, Becky


Kraft Outlet Giveaway . . .


Just a quick post to share a great giveaway with you!   The Kraft Outlet (and their blog 'The Kraft Journal') are having a 'spread the word' giveaway and  you have several ways to win these goodies ...


If you are a fan of The Kraft Outlet and The Kraft Journal, you will already know about this, but if not, you will definitely want to check them out soon!  This giveaway ends on Monday, September 5th!