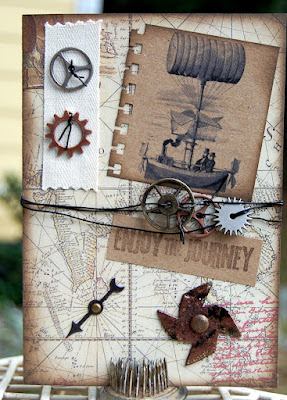
This week's challenge at Papercraft Star is to make a steampunk themed project. Now, I made this project as a part of my application for the Papercraft Star design team, and although I didn't make the team, I still wanted to share this card, because I think it's pretty cool!
Supplies:
- Base (kraft) cardstock - The Paper Studio
- Patterned paper - Gartner Studios - Bon Voyage - Map (found at Michaels)
- Chipboard pinwheel - Bo Bunny
- Enjoy The Journey Stamp - Tim Holtz
- Brads, game spinner and sprockets - Tim Holtz Idea-ology
- Black wire - WalMart hardware department (it's a very soft plastic coated wire)
- Steampunk image - The Graphics Fairy
- Inks - Stampabilities and Anna Griffin
- Embossing Powders - Ranger
Tools:
- Computer and ink jet printer
- EK Success border punch
- Scissors, craft knife, ruler, rotary cutter
- Heat embossing tool
Tips:
- I cut the paper so that the lines on the map were so I could put the game spinner in the center
- The chip board was 'blackboard' chip board, so I inked it and added several colors of embossing powders, heating in between each, to get the grungy look you see
- For the wired sprockets, I attached the end of the wire to one of the sprockets, then wrapped the wire around once, attached another sprocket, wrapped it once again, attached the last sprocket, and then twisted the wire together to hold it all together. I really love that look!
And yes, I love this card! It is perfect for a young man going to college, or an older man retiring and starting a new journey in his life. Or any other occasion you can imagine! Thanks so much for visiting me today! Come back soon and see what I've been up to here at Camellia Cottage. Blessings, Becky


5 comments:
Hi Becky! What a wonderful card! I love the map paper and the wire with the gears, such a great idea. Fabulous work, I am so glad you shared!
Becky, you did just an amazing job with the steampunk trend! Seriously, a wonderful creation! All the little details you put into this has really paid off. Thanks for sharing your creation with us at Papercraft Star! I've sid this before, but I always enjoy seeing what you share with us.
Que lindo cartão! A imagem no barco antigo é barbara!!!
I love that you printed the image on kraft paper! All the details are just fabulous!
So happy you played along for this Steampunk challenge at Papercraft Star!
Kindest regards,
Jennifer
I'm so glad you shared this with everyone for the challenge. It really is a great card. Lots of fun steampunk elements that are grouped together wonderfully. Thanks for playing the challenge this week Becky. Always nice to have you with us. :-)
Post a Comment