Thanks for visiting!


Welcome! This is the place where I share my artsy and crafty projects. I am an evolving artist these days ... finding myself enjoying less of the cards and mini albums that I have made for years, and turning to art journaling and more artistic endeavors. I have always enjoyed some craft or other, and some of my earliest memories of my mother helping me make paper dolls and other crafts. I am now in my 60's and finding myself more passionately enjoying creating beautiful things and learning new skills and techniques and products.

While you are here I hope you will find inspiration and ideas for making your own projects, however any images or projects you find here are my personal property and should not be used for your own monetary gain, or for contests or challenges. Thank You!

9/30/2008

World Card Making Day - RAK

Here it is - a picture of the RAK I'll be giving away sometime early next week on Scrapbook.com. I'll be hosting 3 challenges this Friday afternoon into Sunday (to give all time zones a chance), and we'll have a vote early in the week for the WCMD 'Card of the Year'! Everyone will have a chance to vote on their favorite card made during WCMD, and the winner will get this great bunch of goodies from my own personal stash!

There are buttons, brads, eyelets, chipboard, flowers, ribbon, paper lace, journaling pages and tickets, handmade felt flowers and birds made by *me*, and a set of bird stamps from Rubbernecker Stamps (my bad, I mistakenly double ordered, so someone else will benefit from my error).

Now, you can join us here on my blog, because I'll be posting the challenges here, too, but to win this great bundle of goodies you MUST be participating on Scrapbook.com. I am in no way associated with sb.com other than being an active member, and I volunteered to host these challenges for our regulars, but you are welcome to join us and try for the goodies. We hope to see you and your cards this weekend! Blessings folks! Becky

CPS # 84 - A gift for you!

Just a quick post to tell you about my entry for CPS's sketch 84 this week. I loved that sketch, and since I was making Christmas Cards anyway, I couldn't resist making a card that's also a holder for a gift card.


The base is Bazzill cardstock, the patterned paper is by My Mind's Eye (LOVE their stuff!) Be Merry - Trim the Tree. The envelope is from an old kit of Anna Griffin stuff I got on QVC years ago. I punched a hole in the flap of the envelope so I could thread the ribbon through and it would hold more securely. Add some brown ink around the edges, a tag, and a bit of organza ribbon and you've got a great way to give out those gift cards this Christmas.

Don't forget this Saturday is World Card Making Day, and I hope to post a picture very soon of the RAK I'll be giving away over on Scrapbook.com during the challenges I'm hosting this weekend. We'd love to have you join us! Blessings y'all! Becky

9/27/2008

World Card Making Day

Hi Everyone! Just wanted to take a sec and remind you that next Saturday, October 4, 2008 is World Card Making Day. There are TONS of websites and blogs out there that will be having challenges and such, and one of those is on Scrapbook.com (sb.com), where yours truly will be hosting a challenge thread on their challenge forums.

Because our cardmakers on sb.com are all over the world, I'll actually be starting it on Friday afternooon eastern time, so that my friends all over will have a chance to join in the fun. I'll have one thread, or post, but will have 3 challenges: one for theme, one for product/technique, depending on how you look at it, and one that you'll need 3 sheets of coordinating 12 x 12 scrapbooking paper, so go through your stash so you can be prepared.

On Sunday the 5th - Tues. the 7th we'll have a vote for the best card of the day, then put the top 3-5 on a poll and vote on the winner of a nice 'assortment' RAK from me. I hope to post a pic of it on here tomorrow or Monday. On Friday the 3rd, once I get the thread up and running, I'll post a link to it on this blog, so if you want to join in, PLEASE come and join us!!! If you aren't a member of Scrapbook.com, it's really easy to join and doesn't cost a thing!

So, now you know, and you don't have any excuses not to come and join us next Saturday for "World Card Making Day!" Have a blessed one! Becky

9/25/2008

CPS # 83 - My Friend!

Hello! It's been another lovely day here, but some clouds are beginning to move in this afternoon. No worries, though, as they aren't predicting any rain, just a few clouds!

It has taken me all week to do this week's card for CPS. I couldn't find my inspiration, and just couldn't get the card-making mojo going! But this morning, it all sort of came together, and I love this card. It's called "My Friend".


My inspiration came from the lovely garden watering can full of tulips! It's such a soft picture, but full of sunshine and happiness! That picture, as well as the butterfly and the bluebird on the inside are from clipart software. The base is Bazzill cardstock, the paper is 'attractive' from Basic Grey's 'Sugared' line of papers. I inked the edges of the papers and cardstocks with some brown ink that has a pinkish tinge to it.


After that I added some stickles to the flowers and a pretty shimmering pink organza bow, and that was it - so simple after days of agonizing over it!


On the inside is the quote "Knowing you brings the blessing of sunshine and the joy of laughter to my life. Thank you for being my friend." And on the other side I added the clipart bluebird on a circle of pink cardstock.

Now, I only have one problem. Which of my friends gets this beautiful card??? Blessings, Becky

9/23/2008

2 Sketches 4 You - Laura's Sketch 9 - Gratitude

It's a beautiful day in my part of northern Georgia! The sun is shining, the temps are cooler than they have been in recent weeks, and there's a nice breeze blowing through the trees - just lovely! I just spent some time outside taking the pictures for this week's 2 Sketches 4 You sketch, and with that sunny sky, the colors came out very clear and true.


Fall colors are so appropriate for right now, so I used papers from a 3Birds kit in the earthtones of beige, olive, brown, tan, orange and a bit of aqua thrown in for good measure! The wide satin ribbon I used for the bow matches the aqua stripe perfectly. (Thanks to Kath for showing us how to make a pretty wrap around bow!) The curvy piece on the righthand side was cut using a Making Memories journaling sheet as a template, then I used some Stickles on the flowers for a little bling.

The 'gratitude' tag was printed on my inkjet printer, trimmed, the corners rounded, inked and attached to the top of the bow with a large brown button threaded with the aqua ribbon. A simple card that packs a big punch, and I know just who I'm going to send it to!

Well, laundry duty is calling, so that's all from me for now. I'll leave you with one more picture from another angle so you can see a little more detail. Have a blessed day everyone!!! Becky

9/21/2008

Basic Grey Challenges - Distressing

I know some of you saw this a couple of weeks ago when I first posted it, but I wanted to re-post it so I could enter it in the Basic Gray Challenges. I have to say, my aunt that I made it for just LOVED it! She called me as soon as she got it in the mail to let me know she'd received it and tell me how much she loved it.
For this card I used Bazzill as the base, and Basic Grey's Boxer papers. The green is 'Fedora' and the red is 'Vintage Tee'. The image and the stamps are from clipart software.

I distressed the edges of the papers using the scissors distressing method, then inked the papers with brushed corduroy Distress Ink and brown ink. After that I machine stitched around the perimeter using 5 or 6 different stitches - look closely! There's a hydrangea blossom with an old heart charm in the center, a couple of international postage stamps from clipart software, a gold crown charm from an old Anna Griffin kit, some velvet ribbon, and a dragonfly charm.


The lace bow is attached to a tag that pulls out from under the rose picture - just above the velvet ribbon - and says "Welcome Home". You can't see it in the pic, but I attached the bow to the tag with a small safety pin. I also added the least little bit of 'diamond' stickles to the rose blossoms for accent.
Thanks so much for visiting today! Blessings, Becky

9/18/2008

2 Sketches 4 You - Kazans Sketch 9 - Precious Little One

As I told you in a post earlier, my lss had a big 'scrap pink' all day crop to raise money for breast cancer charities. They gave away tons of door prizes, and I got three of them! My card for 2S4U today was made using some of these beautiful papers from My Minds Eye - Tres Jolie - Mademoiselle - Mother line of products that I brought home from the crop. Here's my card, called 'Precious Little One':


The base paper is a stripe in light blue, lavender and a mix of neutrals. The stripe across center is from a lavender and cream floral paper. The stip across the top is part of a border set made to match the papers. The chipboard tag is Autumn Leaves 'foof-a-la' Indian Summer chipboard set. I added a bit of diamond Stickles for a bit of glittery bling!

A bow of aqua satin, and a few hydrangea blossoms with golden pearl centers, and we have a precious little card, just perfect for anyone with a new addition to their family.

That's it from me for now - I must go strangle Oscar Kitty, for he is scratching at the door to my studio and meowing in gutteral tones wanting in so he can destroy something else in here. Anybody want a cat??? Blesings, Becky

CPS # 82 - Fluttering By!

Maybe it was because I was chosen to be in the readers spotlight for my card for CPS last week, or maybe the card making mojo just wasn't flowing, but whatever it was, I had a hard time making my card for this week. It's pretty, it's girlie, and it's one of those cards you can use for any occasion. Here's my take on the sketch - I titled it 'Flutteriing By':


I used some of my favorite papers from Daisy Bucket Designs, in their 'Perfect Harmony' line. These papers have a wonderful linen cloth feel to them, and come in such pretty colors and patterns. The base paper is the back side of 'delaney'. I used the scissors distressing method on the edges, then stitched it onto white Bazzill orange peel texture cardstock using black thread.


The acetate in center is actually from the packaging one of my clear stamps came in - I cut it to the shape I wanted, then stamped it in black with the 'French Letter' stamp by Stamp Oasis that I bought from Rubbernecker Stamps. I then coated chipboard butterflies with more DBD papers - the largest uses the back side of 'hadley' paper, and the other two use different sections from the 'avery' paper. I added some crystal Stickles to the edges for a little bling. Sorry about the fuzzy pic - sigh!


Next came some black ric-rack and a few spots of white and black dimensional paint for accents, and there you have my butterfly card!


What should have been so simple, somehow took me two and a half days to make. Oh well, that's how it goes sometimes. Thanks for visiting, see you soon! Becky

9/14/2008

Goodies from Scrap Pink All Day Crop!

Hi Friends and Neighbors in Blogland! First I have to say a huge thank you to CPS and especially to Melissa Phillips for choosing my card 'Missing Ewe' for their readers spotlight this week - that was such a huge surprise and honor for me. And thanks to all of you who left such nice comments on my cards for this past week - I cherish every one!

Now, as I told you a few days ago, I spent most of yesterday at my local scrapbooking store (EMI Scrapbooking - link to left) for their fund raiser "Scrap Pink". One of the regular customers' daughter is walking in a 3 day 60 mile breast cancer walk, and they wanted to raise money for her. I don't know what the total was yet, but every penny made goes to the charity.

When I got there yesterday around the 10 am start time, I found my place, marked with a cute little box with Hershey's kisses and my name on it, a 'believe' pink ribbon bracelet, and the kit for our make and take. You're going to love this! Susan, the owner of my lss saw this and got permission from the original creator to make it at the crop, and it's soooooo cute!


They had everything already cut out and put together in a kit, so all we had to do was lay it out and glue it down. This will be hanging in my craft room for a while, I'm sure!


Now, while there, I made an altered notebook and 4 cards. The notebook came from a dollar store, and was really ugly as you can tell from the picture at the right. But I took it together, wrapped the front and back panels with some lovely My Minds Eye Laundry Line paper called Sundress Life, a vintage clipart image, some velvet ribbon and a button, and now you have a lovely little notebook!

The first card I made was using another vintage image from clipart software, and more of the My Minds Eye paper. I borrowed a "Best Wishes" stamp from another lady there named Paula, and stamped it on the rose colored cardstock. A bit of Icicle Stickles on the centers of the flowers, and now I have a nice card in my stash for most any occasion.

I also made three Christmas cards, all using the My Minds Eye papers, and all using vintage images from my clipart software. I added a fair amount of Stickles or glitter glue to these because the cards are simple and I thought they could use some brightening up. Here they are for you to see.


I really love those papers - they are thick and some are glittery and make truly lovely cards. I'm sure I'll be back to EMI soon to pick up a few more designs.

I hope you've enjoyed this look into my weekend activities! Come back again soon to see what I've been in to here at Camellia Cottage. Blessings! Becky

9/12/2008

Another Dare From Daring Card Makers!

Happy Friday Everyone! It's a rainy day here in northern Georgia and, although it's not a lot of rain, just drizzly bits here and there, I'll take every drop with gratitude! We've been in a bad drought situation here for a couple of years now, and nearby Lake Lanier is down something like 17 feet below full pool. My garden is filled mostly with weeds, because there's not been enough rain for many of the flowers to grow and bloom. So, a little rain is very much better than none, and I'm happy to see these drops falling today! Because of the rain, I couldn't go outside to make my pictures in daylight, so they aren't the best, and I'm sorry for that!

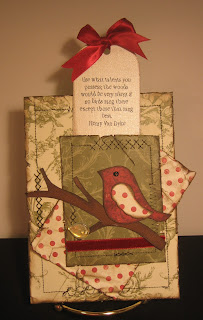
That being said, I've made a card this morning for the Daring Card Makers 'Dare with a Challenge'! The challenge was to take the verse that Kathy gave us, and use it somehow in our card. The verse is "Use what talents you possess; the woods would be very silent if no birds sang there except those that sang best." Henry Van Dyke

I used Bazzill cardstock, topped with some old Anna Griffin paper that I distressed with scissors and then inked with brown ink. I machine stitched around the perimeter using dark green thread in several different stitches. Next came a piece of red polka-dotted paper from Wild Asparagus that I scissor-distressed, crumpled and inked. Next came another pattern of old Anna Griffin paper, which I mounted on a piece of thin cardstock, scissor-distressed and inked, then stitched with the machine as well.

I glued this green piece on top of the polka-dotted piece, leaving the top open to make a pocket. This is where the verse comes in! I took a pearlized beige cardstock and printed the verse on my printer, then while the ink was still wet, added clear embossing powder and heat embossed it. I trimmed the top of the tag in a half circle and added a bow of burgundy satin ribbon.


From brown cardstock I cut a branch freehand and inked it with a darker brown ink. I found the cutest leaf bead in my bead stash, and added it to the end of one branch. Mr. Birdie is traced from a pattern, mounted on chipboard and cut in two pieces - the body and the wing - then inked, and given a seed bead eye. The burgundy paper is also Wild Asparagus. A little velvet ribbon adds a bit of color, and finishes off the card.

That's it from me for now. I hope you've enjoyed your visit as much as I have enjoyed having you visit me here at Camellia Cottage. Blessings to you! Becky

9/11/2008

2 Sketches 4 You - Laura's Sketch 8 and Bonus Card

I have to tell you, making this first card - the one from Laura's Sketch 8 was weird for me. First, just getting started, and deciding what to do was hard, then when I finally did it, the card was so unlike my usual 'thing' that I was concerned. But now, this card has grown on me, and I am just loving it!!! What do you think???


The picture is a black and white 50's-ish picture from a clipart software; printed onto white cardstock. The whole card is on black Bazzill cardstock, and the pic is backed with more of the black cardstock. The grey paper behind the pic is from an ancient paper pack I picked up years ago from QVC. I 'wrapped' the paper around a piece of cardstock, then stitched around the edges with black thread.


After I decided I wanted to use that pic, I started looking for papers, embellies, you know - the fun stuff! Anyway, I found the sticker with the quote, and knew it would fit perfectly. The sticker, by the way, is from an old, old kit, and I couldn't tell you who it was by, although I think it also came from QVC.


The pink gingham ribbon and bow just MAKES the card (imho, lol!), as do the pink, white, grey and black flowers from Petaloo. They are handmade paper flowers and come with the bling already on them.


The addition of a white ribbon with black polka dots, and a few drops of 'diamond' Stickles across the top finished it off!

BONUS SKETCH

Now, the bonus sketch was another matter altogether - I enjoyed making this card so much! But then one of the things I've been doing a lot lately is making pockets on my cards for hidden tags, so this one was a piece of cake! Just look at past posts, and you'll find some of them posted here. Here's my take on the sketch. It's called Christmas Joys.


The background paper is 'Holly Argyle' by Provo Craft. I inked the edges to add a little age here. The green paper is from a Christmas kit I bought last year at WalMart. The green square 'tag' came in the same kit. I scissor distressed the edges of the green paper, then inked it heavily with brown ink. Next I stitched it on all 4 sides on my sewing machine, using a variety of stitches. I glued it to the base on three sides, leaving the top open for the tag.


Once again, the image is from clipart software, and I just love the old soft colors and Victorian feel. I printed it on white cardstock, then inked the edges to age it.

I added a row of vintage red ric-rack from a local store, and lightly inked it to tone down the red a bit. On top of the square tag, I added a couple of silk holly leaves, a silk poinsettia bloom, and a red berry from a Christmas pick. They are tied together with ivory silk ribbon. The tag is made using white cardstock topped with some pretty paper with various seasonal greetings, and topped with a plaid bow.

It's been a fun couple of days working on all these cards, but tomorrow I'll be doing housework and getting my supplies ready to carry to my lss (EMI Scrapbooking - see link at left) for their big 'Scrap Pink' fund raising crop on Saturday. I'll probably have a few things to share after spending the day scrapping. Blessings Friends! Becky

CPS # 81 - Missing Ewe!

Hi Friends! Thanks for visiting me today! I've actually had a quiet week and got a few cards made to share with you. This first one was for the Card Positioning Systems (CPS) Sketch 81. It's titled 'Missing Ewe!'.


Isn't Little Bo Peep the cutest! I found this pic on a clipart software program and printed it on white cardstock using my inkjet printer. The base is Bazzill cardstock.

After I inked the edges I mounted it on green cardstock and inked the edges of that, too. I added a bit of glitter glue (Sulyn Industries. 'opal') on the cloud and flowers at her feet for a bit of sparkle. Missing Ewe! was printed onto white cardstock, inked, and popped off the page with foam squares.


The patterned paper at the back is daisyd's 'Lullaby Patchwork Yellow'. I put a piece of white cardstock in middle, cut off the corners, and 'wrapped' the cardstock to get a cleaner edge. Then I inked the edges and machine stitched around the outside.


Along the bottom, under the picture there is a strip of old lace, and then I added a bow of the same lace, and topped it with a red button threaded with ivory satin ribbon.
I hope you've enjoyed your visit today. Don't forget to leave me a comment - I just love hearing from you! Blessings, Becky

9/09/2008

Daring Cardmakers Sketch

It's me again, back with another pretty card. I've only recently found Daring Cardmakers "dare" blog, and love it! This is my take on their sketch for this week.


The image is from clipart software, printed on my inkjet printer. The rest of the products are as follows:

  • Bazzill cardstock
  • Basic Grey Boxer 'cargo' paper
  • green Bazzill cardstock, inked with brown Stampabilities ink
  • chipboard buckle, topped with Wild Asparagus paper, also inked with brown ink
  • 'Greetings of the Season printed on inkjet printer, trimmed and inked with brown ink.
  • circle of Wild Asparagus paper glued to chipboard, then cut with cuttlebug and Spellbinders 'nestabilities' circle die.
  • felt bird that I traced and cut myself, with a seed bead eye.
  • shimmery organza ribbon and bow, topped with gold button from Buttons Galore and More.


Below are a couple of pictures showing more detail. Thanks for stopping by, and hope to see you here again soon! Blessings, Becky


Too late to submit, but not too late to share!

Welcome friends! Well, because of my crazy, busy week last week, I didn't get my 'card and something else' for CPS # 80 finished in time. But that's okay, I'm pleased with how it came out, and wanted to share it with you anyway. The challenge was to choose from one of their previous 79 sketches and make a card from that, and make something else fun to go with it. I chose sketch #40, and here is my take on the sketch.


Products, from base up:
  • Bazzill Cardstock
  • Pink Paislee Vintage Moon Collection - 'Harvest Moon' paper
  • Pink Paislee Vintage Moon Collection - 'Moonrakers' paper
  • Bazzill pearlized cardstock
  • Melissa Frances rub-on
  • Machine Stitching
  • Inking with brown Stampabilities ink
  • Buttons from Buttons Galore and More
  • Hydrangea blossoms from an old arrangement
  • Pearls from old costume jewelery

For the treat bags, I used small, 2 x 3" plastic zipper bags from the craft store to hold the candy corn.


Products for the bag tothe left are the Pink Paislee Vintage Moon Collection 'Harvest Moon' paper, candy corn hand cut and inked using cardstock scraps, and 'a treat for you' printed on my printer, trimmed and inked with brown ink. This topper is stapled onto the goodie bag.

Products for the topper on the right are Pink Paislee Vintage Moon Collection 'Moonpie' paper, cut using the cuttlebug and Spellbinders 'Nestabilities' Classic Circle - Small dies. I folded the circle in half and creased it, then cut holes with a 1/8" hole punch through the paper and plastic. I threaded the holes with brown satin ribbon, tied a bow, and added the 'a treat for you' tag as above.

That's it for now. Thanks for visiting, and please come again soon! Blessings, Becky

9/05/2008

Headline: Busy Week Kills Play Time!!! Cards for 2S4Y come out unscathed!

Hi Neighbors! It's been a crazy week, and I've had almost zero playtime to de-stress and re-fuel myself. I couldn't sleep last night, so I was up at 3 am working on my two cards for 2 Sketches 4 You this week. First is Kazan's sketch 8!


Once again the base is Bazzill cardstock in a pretty watermelon pink. The flowered paper is from Daisy Bucket Designs Playful Petals collection, and the pattern is 'Lucy'. I adhered it to a thin white cardstock, stitched a simple straight stitch with darker green thread on my machine. Then I lightly inked the edges with ruby colored ink from the ColorBox Petal Point 'Aurora' collection, and attached it to the base.


The verse is actually a sticker from an ages old kit, so don't ask me where I got it . . . at my age, trying to remember too far back isn't advised, lol! The quote says "Don't ever save anything for a special occasion. Being alive is the special occasion." That really put in words how I've been feeling these recent weeks since I've been getting some exercise and spending more time outside.

Now, back to the card! I put the sticker on more of the watermelon pink cardstock and popped it up off the card with foam squares. To the right of the verse is a pretty bow of aqua organza ribbon and a gold button for accent.

The strip across the top is from the same Daisy Bucket Designs collection as the floral paper, but the pattern is "Gabby". I cut out a strip, backed it with cardstock and inked the edges with the ruby ink as before. The flower is Scenic Route chipboard that I topped with the green polka-dotted paper that is the reverse side of the 'Lucy' paper, then lightly sanded it with an emery board and inked with the ruby ink. The bling is an old earring. For a few years my mom worked at a thrift store, and as she went through jewelery, if she found a piece that was broken or without a mate, she saved it for me. It's been a while since she worked there, so I'm gonna have to go yard sale-ing for some more jewels!

Okay, on to the Bonus Sketch by Christine. Luckily, this one also fits for the September Card Challenge over on Scrapbook.com in the color category. The color(s) for this month are fall colors. I had fun making this card, too!


The lovely paper is from Pink Paisley's Vintage Moon Collection in the Harvest Moon pattern. I touched up most of the design on the paper with some Sulyn Industries glitter glue in 'opal' for some shine and shimmer! That really made the card, in my opinion. The two leaves are hand cut from cardstock, and heavily inked and heat embossed with varioius colors of inks and powders to get the 'aged' look. The veining was done with a scoring tool while the melted embossing powder was warm. The pumpkin was printed from clipart software and inked with brown Stampabilities pigment ink to tone down the brightness, then heavily inked with clear Stampabilities pigment ink and heat embossed using clear powder.

The bow is from some ribbin I've had for ages, the button is from buttons galore, and the tag was made using my new favorite way to add a few words to a card.

I printed the words onto cardstock, then cut the rectangle using my rotary cutter with a scallop blade. Then I punched a hole using a 1/4 inch punch and cut a slit from the center down to the hole. This is an easy way to make a quick tag, whether for a gift or a card.


Well, that's all from me for now. Gotta get some things done around the house and run a couple of errands. Have a wonderful weekend, and maybe next weekend I'll have more time to play, here at Camellia Cottage! Blessings friends! Becky